The tutorial has 2 parts:
You will need to first download the source code for Electricity Tracker application (which includes web4j.jar):
![]()
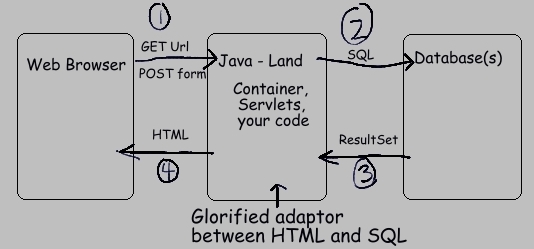
Web applications connect a web browser to database, and allow users to view and edit the data. The database is usually a relational database. Structured Query Language (SQL) is used to interact with a relational database. In addition, web applications are built on top of the simple request/response structure of HTTP.
[document root directory]
  index.html
  tableOfContents.html
  faq.html
  essays/
    baudelaire.html
    proust.html
    maupassant.html
How can this be extended to allow for code? In Java, you create a web application by extending this basic directory structure in two ways:
If we changed the simple static web site shown above into a Java web application, then it would have this general form:
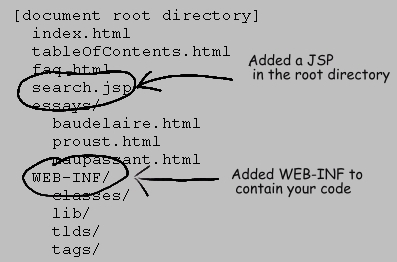
Although there are variations, the /WEB-INF/ directory typically has this structure:
/WEB-INF/ - contains web.xml (see below)
/WEB-INF/classes/ - your Java classes, arranged in packages
/WEB-INF/lib/ - Java libraries, in the form of .jar files
/WEB-INF/tlds/ - .tld files, which configure tag libraries (used in JSPs)
/WEB-INF/tags/ - .tag files, which are reusable JSP snippets (used in JSPs)
The web.xml file is important, and has the official name of deployment descriptor. It contains configuration information. It tells the container (see below) what it needs to know about your application, in a portable manner. It can also be used by your application, as a place to specify your own configuration items.
Items specified in web.xml include:
The HTML and JSP files under the root directory can still be served directly to a browser. All files under the /WEB-INF/ directory, however, have a special status. Since they contain your code, these files cannot be served directly to the browser. This protects you, since if the files were served directly, in the same manner as HTML files from a static web site, then that would pose a grave security risk to your application. Why? Because hackers could easily gain an enormous amount of information about your code.
Your web app, from the root directory on down, can be placed in a standard zip file, and given the extension .war (web app archive). Such war files are the most common way to deploy java web apps.
 Q: How does the container decide which application should handle each incoming HTTP request?
A: It's actually quite simple. Each application is mapped to its own URL - or more precisely part of a URL, called a context.
This is best explained with an example.
Let's say you run a site called foodies.com on a Tomcat server.
If that server explictly maps the context 'cheese' to web application X, then any URL of the form:
http://www.foodies.com/cheese/*will be passed by the container to that web application X. That is, the container will pass the incoming HTTP request to web app X for processing. The exact way a context is assigned to a web app depends on the container, but it's always a simple, straightforward mapping.

A Java web application is, in turn, made up of one or more servlets. Many web apps have a single servlet, but some use more than one. The Electricity Tracker has a single servlet. The Fish & Chips Club application has two - one for the main problem domain, and a second one to redirect directory requests to a designated home page.
Within each web app, the 'remaining' part of the URL (that is, the part that comes after the context) is used to map each request to a specific servlet. That mapping uses settings in your web.xml file. This mapping task is not quite as simple as the mapping of context-to-web-app, and can take various forms, according to your needs. One common style is to map a servlet to an extension such as '.do'. Let's take these example URLs to illustrate:
URL A: http://www.foodies.com/cheese/poll/viewresults.do
URL B: http://localhost:8080/electricity/main/home/SpendingAction.list
These URLs are split up by the container into three basic parts:
| URL A | URL B | |
|---|---|---|
| server | http://www.foodies.com | http://localhost:8080 |
| context | /cheese | /electricity |
| remainder | /poll/viewresults.do | /main/home/SpendingAction.list |
The context is used to decide which web app to call, and the "remainder" is used to map to a specific servlet within that web app. In many cases, all URLs under a given context will be handled by a single servlet.
The servlet API defines various scopes under which objects may be placed. Items are placed in these scopes as a name-value pair, where the name is a String, and the value is an arbitrary Java Object. Roughly speaking, this is just a way of passing data around. The most important instance of this is in your Actions. Your Action classes (see below) typically retrieve data from the database. To pass this data from the Action class to a JSP, where the data is rendered in HTML, the Action usually places the data in 'request scope' under a given key name. This allows the JSP to later reference the data, under the same name.
Placing an item in 'application scope' roughly means that a JSP or a class can get access to the item at all times. Placing items in 'request scope' and 'session scope' means that they can be accessed only in that request or that session, respectively.
<table class="report" title="Spending" align="center">
 <caption>Electricity Spending</caption>
 <tr>
  <th title="Line Number">#</th>
  <th title='Amount Paid'>Payment</th>
  <th title='Kilowatt Hours'>KWH</th>
  <th title='Estimated Reading'>Est</th>
  <th title='Amount Per KWH'>Per KWH</th>
  <th>Building Type</th>
  <th>Comment</th>
 </tr>
<c:forEach var="item" items="${itemsForListing}" varStatus="index">
 <tr>
  <td title="Line Number">${index.count}</td>
  <td align="right">
   <fmt:formatNumber value="${item.payment}" pattern='#,##0.00'/>
  </td>
  <td align='right'>
   <fmt:formatNumber value="${item.kilowattHours}" pattern='#,##0.0'/>
  </td>
  <td align='left'>
   <c:if test="${item.isEstimated}">
    <span title='Estimated Reading'>E</span>
   </c:if>
  </td>
  <td align='right'>
    <fmt:formatNumber value="${item.paymentPerKWH}" pattern='#,##0.00'/>
  </td>
  <td align='left'>${item.facility}</td>
  <td align="left">${item.comment}</td>
 </tr>
</c:forEach>
</table>
Can you spot all the items in the above JSP snippet which are not standard HTML?
The first row of the table contains column names, and is implemented with standard HTML.
But the remaining rows are rendered dynamically, using a mixture of HTML and JSTL (JSP Standard Template Library).
The <c:forEach>,<c:if>, and <fmt> tags are part of JSTL.
So are all items appearing with the '${...}' syntax.
For example, ${itemsForListing} refers to the collection of items being rendered in the table.
This is an example of something mentioned earlier in the tutorial: a reference to a Java object
(a List of Model Objects, in this case) which has been placed explicitly in "request scope" by an Action class, in order to be rendered in the JSP.
For more information on Java web applications, and Java in general, here are some good references:
| File Type | Num Files | Comment |
|---|---|---|
| .html | 4 | Plain HTML. |
| .jsp(f) | 3 | HTML plus JSP/JSTL, with some custom tags. |
| .tag | 5 | Reusable JSP snippets. |
| .java | 11 | Domain classes, plus some classes required by the framework. |
| .tld | 4 | Tag library files. You don't touch these. |
| .jar | 6 | Required Java libraries. Includes web4j.jar. |
| .xml | 2 | web.xml, and electricity.xml (the Tomcat context file). |
| .sql | 2 | SQL statements used by the app, and a script for creating the database. |
| .css | 1 | Cascading style sheet. |
| .ico | 1 | Image used by bookmarks. Referenced in the <head> of Template.jsp. |
| Directory | Contains |
|---|---|
| [ROOT] | Home page, error pages, stylesheet, icon. |
| main | A template JSP. |
| WEB-INF/ | The web.xml deployment descriptor. |
| WEB-INF/lib/ | Required jar files. |
| WEB-INF/mysql/ | Single database script for creating the database. |
| WEB-INF/tld/ | Contains only .tld files, which add custom tag libraries to your application's environment. Custom tags are used in JSPs. You don't typically touch these .tld files. |
| WEB-INF/tags/ | Contains only .tag files, which are encapsulated snippets of JSPs. |
|
WEB-INF/classes/ hirondelle/web4j/config/ |
Implementations of interfaces required by WEB4J. |
| WEB-INF/classes/ hirondelle/electricity/ |
The bulk of the application's code. |
/Error.html, /ErrorAccessDenied.html, /ErrorBadRequest.html
Error pages. These exist to override the default error pages served by your container (Tomcat).
The problem with such container default pages is that they are often a security risk, since they expose details that are useful to hackers.
They're also ugly, and inappropriate for end users.
It's a good idea for a web app to replace such default error pages.
These custom error pages are referenced in web.xml. In effect, the container is simply instructed to replace its own error pages with new versions specific to your web app.
/index.html
The home page for the application.
This file exists because requests such as
http://www.blah.com/don't refer to a specific location or 'file' (it's actually often not a file.) Thus, the container needs instructions on what exactly to serve for such requests -- that is, what should be served by default. This item is configured in web.xml as a <welcome-file>, to be served when an incoming URL request specifies only a directory, and nothing else.
/stylesheet.css
Standard Cascading Style Sheet. Exists in order to encapsulate styling decisions.
Reduces repetition of styling information.
/main/Template.jsp
Template for JSPs. Exists in order to define a shared layout in one place - header, body, footer, and so on.
The big idea here is that 'main' is a module that contains N features. (In the present instance, N=1, but the idea is that new features can be added to main just by following the same pattern used in main.home. This is in fact done in Part Two of this tutorial.) Those N features usually need to share the same look. This template defines that look. Each feature, in turn, provides its own version of the 'body' of Template.jsp.
(To clarify, 'module' is informally used here to refer to a collection of features that share something in common. For instance, a 'main' module might contain features needed by typical users, while a 'webmaster' module would contain features only accessible to an administrator.)
For comparison, in the Fish & Chips Club application there are several modules, each containing N features. Each module has its own look, so each module defines its own Template.jsp.
Again, this is one way of implementing templates. If, for example, you decide that all pages in the app need to have the same look, then you will need to slightly modify the given style (not hard - just don't use 'main').
You could explore ways to implement such templating using JSPs, but the style presented here is likely among the simplest.
/WEB-INF/web.xml
The web.xml deployment descriptor is an important file. (See description above.) It contains your app's config. It instructs the container (Tomcat) on how to
run your application. It contains a mixture of general items defined by the servlet API itself (used by the container), and items defined by WEB4J (used by the framework).
In Electricity Tracker, the number of items in web.xml is relatively small, since,
for simplicity, a number of WEB4J settings are left out.
These WEB4J settings take default values when left out, but that is not true of web.xml settings in general.
For reference, the full set of WEB4J config items is listed here.
You need to exercise some care when editing web.xml, since if you make a small typing mistake, the file will be rendered invalid, and your app will fail to start.
/WEB-INF/JspHeader.jspf
Items that are included at the start of every JSP.
This is a fragment of a JSP. It's not a complete JSP, but rather something that can be added to JSP.
Hence, it has a different extension, '.jspf'.
This item is referenced in web.xml, as part of jsp-config.
That reference causes the container to place this JSP fragment at the start of every JSP.
The fragment itself contains a character encoding, and some items which allow tag libraries to be referenced.
/WEB-INF/TagHeader.jspf
This is very similar to JspHeader.jspf (see above), in that it exists to reduce repetition.
This file is referenced in all .tag files.
In this case, those references need to be added manually to each .tag file, since there's no mechanism in web.xml for doing so.
/WEB-INF/lib/*.jar
These .jar files contain libraries -- collections of Java classes. 'Jar' stands for 'java archive'.
Jars are basically zip files containing compiled Java classes.
At runtime, when the container is running your app and it encounters a class that has not yet been loaded, then it searches in several standard places for the implementation of the class.
The servlet API specifies that one of those places is this /WEB-INF/lib/ directory.
Your web apps will almost always have such a directory.
In the current case, the jars present in this directory are used by the web4j framework. But you can place other jars here as well, as needed. If, for example, your app needs file upload support, then you can add third party jars that support that task to this directory.
During development, you will need to point your IDE to these libraries, such that they are on your build path.
/WEB-INF/mysql/CreateTables.SQL
Simple script for creating the MySQL database used by Electricity Tracker.
This script is used only by the developer. It's not used at runtime, since at runtime the database has already been created.
It's mildly interesting to note why this item is placed here. It's not placed in the root directory, since that would be a grave security risk: the file could be served by the container, just like an HTML file in the root directory. That's a big no-no, since it would give hackers details about your app's underlying database. Since this file is below /WEB-INF/, however, which the servlet spec states is a 'protected area', the file can't be served automatically by the container.
Note as well the extension is '.SQL', not '.sql'. The reason for this is that WEB4J, upon startup, scans your application's source for all files that end in '.sql' (case-sensitive), and inspects their content for the SQL statements used at runtime by your app. Changing the extension to the upper case .SQL ensures that the file is not selected during that process.
/WEB-INF/tags/displayMessages.tag
JSP snippet which renders success/fail messages to the end user.
The messages are rendered with a <w:messages> tag.
<w:messages name="web4j_key_for_errors">
  <span class="error">placeholder</span><br>
</w:messages>
This tag uses its body as a simple template. It replaces the special 'placeholder' text with the actual message. This way, you can wrap your messages with arbitrary markup, to make them render as desired.
The messages come from your Actions. Calling addMessage or addError in your Action class will make the message visible to this tag. You can call these methods multiple times in your Action, and each message will be added to an internal list. Then, each message will be displayed here, one after the other, in the same order.
/WEB-INF/tags/editLinks.tag
JSP snippet which creates links and buttons for editing and deleting items in a listing.
Exists because it's common to have listings of items that can be edited, by either changing the item, or by deleting it.
It's useful to encapsulate such items since they are often used throughout an app.
/WEB-INF/tags/footer.tag
JSP snippet for the footer of each page.
Uses an item named web4j_key_for_app_info.
Each WEB4J app must provide an implementation of the ApplicationInfo interface. This tells WEB4J basic info about the app - name, version, and so on.
Upon startup, the framework will use that implementation to create an object, and place it in 'application scope', under the name 'web4j_key_for_app_info'.
/WEB-INF/tags/head.tag
JSP snippet placed in the <head> tag of a JSP. Refers (somewhat obscurely) to param.TTitle.
This is a request parameter that is defined by the templating mechanism used by the ResponsePage class.
The ResponsePage class is used by your app to tell the container which JSP is used to render the final result to the user.
The ResponsePage can simply point to a single file, or, more commonly, it can point to a template JSP.
The template defines the overall look for a given set of pages -- perhaps for the whole site, perhaps for a subset.
It also uses two special request parameters,
/WEB-INF/tags/setFormTarget.tag
In the list-and-edit style of user interaction used by Electricity Tracker, the same form is recycled for various operations.
The form can be used either for an 'add' operation or a 'change' operation.
In some cases, the form's action URL can depend on this add-versus-change logic.
This tag exists to encapsulate that logic. It calculates the form target, and places it in a variable named 'formTarget'. This variable is then used by the calling JSP. Thus, the calling JSPs don't need to repeatedly calculate the form's action URL.
Some forms will find this tag useful, some won't. For example, a search or query operation typically uses a single form action, so this tag wouldn't be useful in that case.
/WEB-INF/tlds/*.tld
These .tld files are tag library descriptors. They configure tag libraries.
You typically just copy these files into this directory. You typically don't edit them. They can be used simply as documentation by the programmer,
to find out what services are provided by the library.
If someday you create a tag library, you will need to create a corresponding .tld as well.
The c.tld, fmt.tld, and fn.tld are from the JSTL - the JSP Standard Tag Library, which is widely used. The web4j.tld is specific to web4j. It defines a number of custom tags you can use in your JSPs. Two common such tags are:
/WEB-INF/tomcat/electricity.xml
This file is for developers only. It's not used at runtime.
It's a file specific to the Tomcat container.
It exists because you need to define a context for a web application (as mentioned at the beginning of this tutorial).
The method of doing this is specific to each container. See Part Two for how this file is used to deploy the
Electricity Tracker application.
/WEB-INF/classes/hirondelle/web4j/config/AppInfo.java
Required item. Exists because WEB4J requires that your app supply an implementation of the ApplicationInfo interface.
A simple class, just carries basic data like name and version.
/WEB-INF/classes/hirondelle/web4j/config/ConnectionSrc.java
Required item. WEB4J requires that your app supply an implementation of the ConnectionSource interface.
When WEB4J's data layer interacts with your database, it needs a database connection in order to do this.
There are many policies an application may take with respect to getting a database connection.
This class exists to let you specify that policy in any way you want.
/WEB-INF/classes/hirondelle/web4j/config/ConvertParamErrorImpl.java
Required item. WEB4J requires that your app supply an implementation of the ConvertParamError interface.
WEB4J performs simple conversions from underlying request parameters (Strings) to various building block objects such as Date, BigDecimal, and so on.
Since the incoming data is not completely under your control, these conversions can sometimes fail.
This class exists because WEB4J needs to know how you want to report such conversion failures to the end user.
Note that these conversions do not form part of your Model Object validation, where you define the constraints being applied to user input. That's a different task, and is handled in another way (see Spending.java).
/WEB-INF/classes/hirondelle/web4j/config/DateConverterImpl.java
Required item. WEB4J requires that your app supply an implementation of the DateConverter interface.
Deals with parsing and formatting dates.
It's natural for an app to define a specific format for dates, such that the end user can repeatedly use the same format when entering dates.
Since dates can be treated in so many different ways, the framework lets you decide exactly how you would like to do this.
/WEB-INF/classes/hirondelle/web4j/config/Startup.java
Required item. WEB4J requires that your app supply an implementation of the StartupTasks interface.
Exists because when your app starts up, there are often one-time initialization operations that need to happen.
A common example is placing code tables in memory.
/WEB-INF/classes/hirondelle/web4j/config/TranslatorImpl.java
Required item. WEB4J requires that your app supply an implementation of the Translator interface.
Exists in order to implement multilingual applications. The current implementation is a simple do-nothing class, since
this application has only one language.
If, in the future, you decide to make your app multilingual, then:
/WEB-INF/classes/hirondelle/electricity/codes/code_table.sql
SQL SELECT statement for fetching code tables.
Here, there's only one code table, called FACILITY. It refers to residential or commercial properties.
It exists simply because almost all applications use code tables, and even a minimal application should have one.
There are 2 tables in the database -- a code table and regular domain table.
This code table is fetched only once, upon startup, and then placed in memory. It's also placed in 'application scope' under a specific key. This makes it easy to reference in JSPs.
There are other variations on code tables that are possible.
/WEB-INF/classes/hirondelle/electricity/codes/CodeTable.java
Exists in order to enumerate all the code tables in the application.
Here, there's only one such table.
But, you can extend this scheme to many code tables in a natural way, just by following the pattern.
Uses the Id and Code classes. Id is a generic sort of identifier class. Code is intended specifically for code tables, but you aren't required to use it to implement your own code tables.
Note that this class is an enumeration class. As well, it has methods that allow the caller to translate, as it were, an Id into a Code. This is useful in Model Objects, where the underlying request parameter is an Id, but is modeled as a Code. It's advantageous to model it as a Code, since the text description is immediately available. The text description is presented to the user. It's also useful for logging and debugging.
/WEB-INF/classes/hirondelle/electricity/codes/CodeTableUtil.java
Exists in order to pull in code tables upon startup.
Places code tables in memory, in a form which makes lookups convenient.
Again, here there is only one such code table, but this class could be easily extended to more, just by following the pattern.
/WEB-INF/classes/hirondelle/electricity/main/home/Spending.java
Model Object. Exists in order to encapsulate and validate the data being stored in the Spending table.
This is an example of an immutable object -- an object whose data never changes once it's constructed. The constructor is the most important method. Note that it must throw a ModelConstructorException. This is how your Model Objects communicate problems to the caller.
The toString, equals, and hashCode methods are defined in the Object class. It's always prudent to override these methods. They ensure desirable behavior for logging and Collections.
The getSignificantFields method exists since equals and hashCode need to refer to the same items.
/WEB-INF/classes/hirondelle/electricity/main/home/SpendingAction.java
The Action class for this feature.
The Action is the public face of each feature.
It calls all of the other elements of the feature, directly or indirectly.
Your Actions will usually subclass a "template" abstract base class, defined by the framework. Several such template classes have been defined by WEB4J, but you can certainly define your own, if desired.
The SqlId declarations define what underlying SQL operations are performed by the Action. They exist because the text .sql files are not compiled as Java files. Thus, a bridge of some sort is required between .sql-land and Java-land. These SqlId declarations form that bridge. Once declared, they also allow you to later refer to SQL statements using Java objects instead of repeating magic Strings all over the place.
Upon startup, WEB4J scans your code for all such SqlId fields. They are matched one to one to corresponding items in your .sql files. If any mismatch is detected, then your app will not run. This protects you from simple typographic errors associated with magic Strings. It also protects your app from including items that are no longer used.
If you wish, these SqlId fields could be declared in Data Access Object (DAO) instead, but that would often mean that the DAO would need to change from package-private to public.
The RequestParameter declarations define the white list of accepted request parameters. If this Action encounters any unknown request parameter, an error will result. This is an important security measure.
RequestParameter objects define hard validations (length check, regex check). These are different from the soft validations performed in your Model Objects. See the User Guide for more information regarding this important distinction.
The addError and addMessage methods are called to pass success/fail messages to the end user.
The implementations of the various attemptXXX methods can vary in details. According to context, you may need to show special concern for duplicate records, missing records, the number of edited items, and so on.
/WEB-INF/classes/hirondelle/electricity/main/home/SpendingDAO.java
Data Access Objects (DAOs) exist in order to encapsulate how you persist your Model Objects.
Each operation has its own method in this class, and its own underlying SQL statement. The SQL statement is referenced using SqlId objects. These SqlId objects in turn point to entries in your .sql files.
In this case, every method uses the Db utility class. When passing data to the methods of the Db class, the order in which data is passed corresponds directly to the order of appearance of the '?' placeholders in the underlying SQL statement.
/WEB-INF/classes/hirondelle/electricity/main/home/statements.sql
Exists to define the SQL statements used by this feature.
Usually, each feature will have its own statements.sql.
Each SQL statement is placed in a named block, similar to a block in Java, as in
DELETE_SPENDING {
  DELETE FROM Spending WHERE Id=?
}
To act as a bridge between your .sql files and Java, a SqlId object corresponding to
each such named block is declared somewhere in your code, as in
public static final SqlId DELETE_SPENDING = new SqlId("DELETE_SPENDING");
This declaration is usually declared in the feature's Action. If you place the declaration in your DAO, then the DAO will need to be made public (not package-private). The String passed to the SqlId constructor must match the name of a block in an .sql file.
/WEB-INF/classes/hirondelle/electricity/main/home/view.jsp
Exists to provide the user interface for this feature.
Consists of a fragment of Java Server Page (JSP).
This fragment is passed to /main/Template.jsp as the 'body' section of the template.
Usually, each feature will have its own view.jsp.
Most features will follow this style. When needed, it's also possible to refer to a full JSP directly, without any templating.
The System Requirements for this tutorial are:
The electricity.zip file includes web4j.jar. It also includes compiled .class files, which means that, initially, you may run the app without needing to compile. Any additions or changes you make to the code will, of course, will require a recompile.
It's highly recommended that you do not use an IDE for this tutorial. If you use an IDE, and a problem occurs, then it won't be clear if the problem is related to the IDE or to WEB4J. To aid with compilation, the required javac command line is provided below for your use.
It's strongly recommended that you use MySQL for this tutorial. If you wish to use a database other than MySQL, you'll need to do a little extra work on your own:
In general, deployment is something whose details depends on the servlet container you are using.
There are different ways to deploy web applications to Tomcat. Here, we're going to deploy the app to Tomcat in such a way that any changes we make will be automatically detected by the container. This allows the container to detect changes to JSPs, without needing to restart the app. It will also speed up development since it will not actually be necessary to create a .war file.
(Variations are possible. In particular, you can change the extension of electricity.zip file to .war, and deploy it as any war file. However, you should attempt such variations only if you are experienced with Tomcat. It's highly recommended to follow the style used below.)
1. Unzip the file.
Unzip electricity.zip to any location. Since you will be developing, it's a good idea to place it in an area you typically develop in.
For example:
C:\myname\projects\electricity\Just to be clear, this directory will contain:
/main
/WEB-INF
Error.html
...and so on
In the rest of this document, this directory is referred to as ELEC_HOME.
2. Create the database.
Run the provided database script, using your local mysql client. (Your user name will need to have wide privileges.)
It creates the database, and its 2 tables. Here's an example of running the script.
You will need to change the highlighted parts, to point to your
own mysql.exe, and to use your own user name and password. Note that there's no space between
the -p and the password.
[ELEC_HOME]\WEB-INF\mysql>C:\mysql\bin\mysql --local-infile=1 -u myname -pmypass < CreateTables.SQL
3. Put the database driver where Tomcat can see it.
We need to give Tomcat access to the database driver classes.
You do that by placing the database driver (a single jar file) in Tomcat's lib directory, as in:
[TOMCAT_HOME]\lib\mysql-connector-java-5.1.14-bin.jar
Please use the official JDBC driver, available from mysql.com.
4. Set the logging directory in web.xml.
Open the file [ELEC_HOME]/WEB-INF/web.xml. Edit the value of the LoggingDirectory.
Set it to some suitable directory, if you don't like the default.
5. Create the Tomcat context.
The file:
[ELEC_HOME]\WEB-INF\tomcat\electricity.xmlis a Tomcat context file, which tells Tomcat what it needs to do when deploying the app:
You must edit electricity.xml for the following items:
Here's an example of a customised version of electricity.xml. Compare it with your version, to see where you need to make changes specific to your own environment:
<Context docBase="C:\Temp4\electricity" reloadable="true">
 <Resource
   name="jdbc/electricity"
   auth="Container"
   type="javax.sql.DataSource"
   username="johanley"
   password="********"
   driverClassName="com.mysql.jdbc.Driver"
   url="jdbc:mysql://localhost:3306/electricity?useServerPrepStmts=false"
   maxActive="10"
   maxIdle="5"
 />
</Context>
An important point is that C:\Temp4\electricity is, in this case, ELEC_HOME. It contains the unzipped download:
C:\TEMP4\electricity>dir /B
Error.html
ErrorAccessDenied.html
ErrorBadRequest.html
favicon.ico
index.html
LICENSE_BSD.txt
main
stylesheet.css
WEB-INF
If you have chosen to use postgres instead of MySQL, please see this remark
about passing an extra parameter to the connection URL.
6. Deploy the context to Tomcat.
After you have made the above edits, copy the electricity.xml file to this location (if the directory
doesn't exist, just create it):
[TOMCAT_HOME]\conf\Catalina\localhost\
7. Start the application.
If Tomcat is already running, then Tomcat will automatically detect the new context file after a few seconds, and
your app is now deployed to Tomcat.
If Tomcat is not running, then start it now.
Navigate to the home page of the app. The typical URL will be (using the default Tomcat port of 8080):
http://localhost:8080/electricity/Check your log file as well. There should be a timestamped file in the logging directory you specified in web.xml, in a previous step. This logging entry indicates a successful startup:
CONFIG: *** SUCCESS : STARTUP COMPLETED SUCCESSFULLY. *** ...
Please review the log file, and scan it for any problems. Most problems will be related to the database connection pool and the database jar, so please check those items carefully.
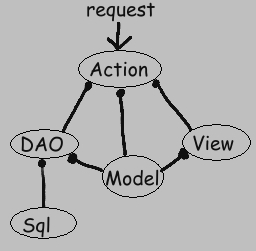
This report will be implemented using 4 items, all placed in the same directory:
Here is how the parts work together (the notation means that the DAO uses the Model, for example):
Create a New Package/Directory.
Create a new package/directory:
[ELEC_HOME]\WEB-INF\classes\hirondelle\electricity\main\report\All items related directly to this feature, and only this feature, will be placed in this single directory. This is an example of package-by-feature.
Create the .sql File.
Create an ordinary text file named statements.sql, located in our feature's directory. It will contain the following:
LIST_HIGH_SPENDING {
 SELECT Id, DatePaid, Amount, KWH, IsEstimated, FacilityFK, Comment
 FROM Spending
 WHERE AMOUNT>=100
}
This is a plain, ordinary SQL statement. The only thing unusual about it is that it's placed in a block named LIST_HIGH_SPENDING.
This block name forms an identifier for that SQL statement. (Typically, there's more than one such block per file.)
Create the View.
Create a file named view.jsp and place it into our feature's directory.
Copy the following into this file:
<P>
<table class="report" title="Spending" align="center">
 <caption>
  High Spending Report -- Num Lines: ${fn:length(itemsForListing)}
 </caption>
 <tr>
  <th title="Line Number">#</th>
  <th>Date Paid</th>
  <th>Amount</th>
  <th>KWH</th>
  <th>Per KWH</th>
  <th>Estimated</th>
  <th>Building Type</th>
  <th>Comment</th>
 </tr>
<w:alternatingRow>
<c:forEach var="item" items="${itemsForListing}" varStatus="index">
 <tr class="row_highlight">
  <td title="Line Number">${index.count}</td>
  <td align='right'>
    <c:set value="${item.datePaid}" var="paidOn"/>
    <w:showDateTime name='paidOn' pattern='MMM DD YYYY'/>
  </td>
  <td align="right">
   <fmt:formatNumber value="${item.payment}" pattern='#,##0.00'/>
  </td>
  <td align='right'>
   <fmt:formatNumber value="${item.kilowattHours}" pattern='#,##0.0'/>
  </td>
  <td align='right'>
   <fmt:formatNumber value="${item.paymentPerKWH}" pattern='#,##0.00'/>
  </td>
  <td align='left'>
   <c:if test="${item.isEstimated}">E</c:if>
  </td>
  <td align='left'>${item.facility}</td>
  <td align="left">${item.comment}</td>
 </tr>
</c:forEach>
</w:alternatingRow>
</table>
Save this file using the UTF-8 encoding. (This will allow your app to support characters from just about any language.)
Let's break this down a little bit.
<c:forEach>, <c:set>, <c:if>, <fmt:formatNumber>, fn:length
These items are part of the JSTL - the JSP Standard Tag Library.
JSTL is widely used in JSPs.
<w:alternatingRow>
Custom tag defined by WEB4J for alternating the display of table rows.
The idea here is that rows which alternate in appearance are more legible.
<w:showDateTime>
Custom tag defined by WEB4J for displaying dates in the desired format.
${item.comment}, and so on
This is the syntax used by the Expression Language defined in JSP 2.0.
It's a compact way of referring to objects you have placed in scope.
Create the DAO.
Create a Java source file named ReportDAO.java, in our feature's directory.
Copy the following into it:
package hirondelle.electricity.main.report;

import java.util.*;
import hirondelle.electricity.main.home.Spending;
import hirondelle.web4j.database.DAOException;
import hirondelle.web4j.database.Db;
import static hirondelle.electricity.main.report.ReportAction.LIST_HIGH_SPENDING;

final class ReportDAO {
  List<Spending> list() throws DAOException {
    return Db.list(Spending.class, LIST_HIGH_SPENDING);
  }
}
This class will not yet compile, since it depends on an item in ReportAction, and that class hasn't been created yet.
Its single method returns what we are looking to display in a JSP - a List of Spending Model Objects.
This class is package-private. It's not used by any other feature/package, so there is no need to make it a public class. It's always best to minimize scope whenever possible.
Let's take a look at the Db.list() method. The first parameter is a class literal. It defines the class of the object to be returned in the List. The next param, LIST_HIGH_SPENDING, identifies the SQL statement to be used to create these objects.
There's actually one other parameter to this method. It's a sequence parameter (or vararg). It stands for 0 or more pieces of data to be passed to the SQL statement. In this case, the SQL statement has no parameters, so no more arguments appear in this particular call to Db.list().
There's an important ordering convention being used here behind the scenes. Compare the columns returned by the underlying SQL statement with the Model Object constructor:
SELECT
 Id, DatePaid, Amount, KWH, IsEstimated, FacilityFK, Comment
FROM
 Spending
WHERE
 Amount>=100

public Spending(
  Id aId, Date aDatePaid, BigDecimal aAmount, Integer aKiloWattHours,
  Boolean aIsEstimated, Id aFacility, SafeText aComment
) throws ModelCtorException {
  ...
}
Q: Can you spot the ordering convention?
A: The columns returned by the SELECT match one to one with the constructor arguments.
It's this ordering convention which allows your DAO to be so compact, since no intermediate mapping is needed.
It's important that you understand this point.
If the order of columns returned by a SELECT doesn't match the items passed to the constructor, then errors will result.
(It's possible to create a report without having a Model Object. That is, if a Model Object doesn't already exist, you don't have to create one just for a report. See the Report class for more information.)
Create the Action.
Create a Java source file named ReportAction.java, in our feature's directory.
Copy the following into it:
package hirondelle.electricity.main.report;

import hirondelle.web4j.model.AppException;
import hirondelle.web4j.action.ActionImpl;
import hirondelle.web4j.request.RequestParser;
import hirondelle.web4j.action.ResponsePage;
import hirondelle.web4j.database.SqlId;

public final class ReportAction extends ActionImpl {

  public static final SqlId LIST_HIGH_SPENDING = new SqlId("LIST_HIGH_SPENDING");

  public ReportAction(RequestParser aRequestParser){
    super(FORWARD, aRequestParser);
  }

  @Override public ResponsePage execute() throws AppException {
    ReportDAO dao = new ReportDAO();
    addToRequest(ITEMS_FOR_LISTING, dao.list());
    return getResponsePage();
  }

  // PRIVATE
  private static final ResponsePage FORWARD = new ResponsePage(
    "Example Report", "view.jsp", ReportAction.class
  );
}
Action classes are always public, since they need to be visible to framework classes.
ActionImpl is provided as a convenient base class for all Actions.
It has a number of utility methods commonly required when implementing Actions.
Your Action can extend it directly.
However, it's often easier to extend other base classes provided by the framework (ActionTemplateXXX), since they may more closely match your needs.
Which one you choose depends mostly on what set of operations the user will accomplish through the Action.
The SqlId field is declared here, but, if you wish, you can just as easily declare it in the DAO. The only reason for declaring it here is to keep the DAO package-private. Since SqlId fields need to be visible to the framework, they must appear in a public class.
Your Actions will typically take a RequestParser in their constructor. That object is constructed for you by the framework. It's used by ActionImpl to allow access to the underlying request.
The FORWARD object is a ResponsePage object. In this case, the templating mechanism is invoked. This report is in the main module, and shares the same Template.jsp as in the other feature, contained in hirondelle.electricity.main.home. The Template.jsp defines the layout, while view.jsp provides the main body of the page.
The single execute method uses your DAO to fetch the desired List of Spending objects. The List is then placed in "request scope" under the key named ITEMS_FOR_LISTING. Placing it in request scope means that it will be accessible in a JSP under the given key name.
The key name ITEMS_FOR_LISTING is defined in ActionImpl for your use. It's just a String, with the generic value "itemsForListing". In the JSP, it is referenced using JSP Expression Language as ${itemsForListing}. If you wish, you can place Model Objects in request scope using any key name you like. For instance, in this case you might have used the key name "largeSpendingList" instead. In the JSP, that would be referenced using Expression Language as ${largeSpendingList}.
Compile Your Classes
Next, make sure your application compiles successfully.
Navigate to the directory
[ELEC_HOME]/WEB-INF/classes/and follow the example javac command contained in
[ELEC_HOME]/WEB-INF/classes/javac_compile_example.txtThe command in this file must be run from the directory in which it resides.
You will likely need to edit this example javac command, to suit your environment:
It's important to note that the generated .class files are placed in their default location -- in the same directory as the corresponding .java file. The reason is the standard directory structure of Java web applications mentioned above. Your compiled classes need to be located under /WEB-INF/classes, or the servlet container will not be able to find your code. Thus, it's not correct to place your compiled classes in a bin directory, for instance.
Add a Link.
All items are now in place. The only thing that remains is to create a link pointing to the new feature's URL.
Open
[ELEC_HOME]/main/Template.jspand add a new link, just below the others:
<c:url value="/main/report/ReportAction.list" var="reportURL"/>
<A href='${reportURL}' title='Report on high spending'>Report</a>
It's possible to do this without using <c:url>. However, using <c:url> to emit links is highly recommended. It protects you from problems with URL rewriting, and allows you to ignore what context your app is deployed under.
Next, save Template.jsp, and restart the application. The restart is needed since WEB4J maps URLs to Action classes only upon startup. When you add a new Action, WEB4J needs a refresh to pull in the new mapping.
Navigate to the main page :
http://localhost:8080/electricity/main/home/SpendingAction.listYou should see a new menu item called Report. Click on Report, and you should see the report listing. For reference, the direct link is:
http://localhost:8080/electricity/main/report/ReportAction.listYou should see the number of rows in the report (0 or more), and a listing of all Spending records whose amount is 100.00 or more. If you see the report, then congratulations, you've just implemented your first feature using WEB4J. Cha-ching!
To test further, click on the the Edit menu item and simply add some records having sufficiently large amounts. When you view the report again, any items with large amounts will appear in the report.
The authoritative documentation should be taken as the User Guide, and the WEB4J javadoc.